Tuesday, November 30, 2010

CC299 JOY

Good Morning! Had a busy couple of days around here, and wanted to share a card that the girls in my club made this past weekend. I can not take credit for the design. The original design is I believe by Sherri Barron another Stampin' Up! demo. I was crusin' through the gallery on the SU demo site Stampin' Connection, a wonderful resource for business tips, beautiful inspiration from other demonstrators, and I found a card that was similar to this. I just put my own twist on it. I remade the card today to fit the Color challenge on Splitcoast today.  Needless to say it was a hit with the club this month! Thanks Sherri! If you would like access to all the wonderful inspiration on Stampin' Connection, now is the time! Through the end of November (today) Stampin' Up! is offering a Huge discount (50% off) on the Stampin' Up! Starter kit! Contact me for more info, or go directly to my SU website for details. Thanks for taking a peek! recipe below-

Stamps - Perfect punches
paper -  River rock, Old olive, whisper white, brushed gold
ink - real red, river rock, choc chip
access - big shot, pefect petals folder, 2 3/8 scallop circle punch, scallop circle punch, real red grosgrain ribbon, 1/2 circle punch, sponge, dimensional dots, 1 1/4 corcle punch

Friday, November 26, 2010

You're such a Trooper


Hi everyone! I am glad to be back downstairs today playing. My Thanksgiving was food and family filled, and super relaxing... didn't even wash a dish! (Thanks Honey!) AND, I was even given the go ahead to keep playing this morning.. (My husband must have something up his sleeve!)

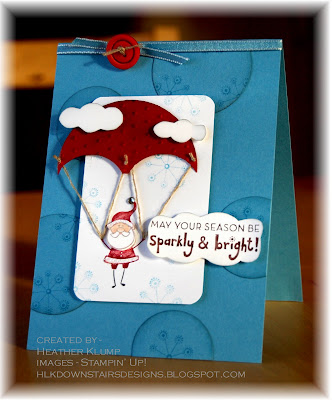
I am playing with my Sparkly and Bright set, and looked at the little Santa in the set, and instantly saw him parachuting down to ground, his little arms held up like that. I punched out various sized circles, stamped them with the snowflake, then sponged the edges with Marina Mist ink to give them some depth. Then randomly adhered them to the card base. I punched a 2 1/2 circle, cut it in half, ran it through my big shot and used my 1 3/8 circle punch to cut away the edge to form my parachute. I stamped Santa in black, crumb cake, and cherry cobbler, then colored his face with a blender pen, and blush blossom ink. The sentiment is stamped in early espresso, then cut out in the shape of a cloud. I add a few more clouds, a rhinestone to the ball of his hat, and some Dazzling diamonds to the trim of his hat and coat. Super Cute!
All supplies Stampin' Up! Details below -

Stamps - Sparkly & Bright
Paper - Marina Mist, Whisper white, Cherry cobbler
Ink - Marina Mist, Early Espresso, Cherry Cobbler, Crumb Cake, Black, Blush blossom
Access - Big shot, Perfect polka dot folder, blender pen, linen thread, marina mist 1/8 " ribbon, red ridding hood red button, sponge, various circle punches, two way glue Dazzling diamonds glitter, rhinestone, dimensional dots.


Tuesday, November 23, 2010

Making Cherry Chocolate Crumble

I wish right! Sounds divine though... I took a little time out of my CRAZY day to take a break, and check out the color challenge on Splitcoast today. The colors for today's challenge were Chocolate chip, Cherry cobbler, and Crumb cake. Now if you didn't have something decadent on your mind after reading those colors we need to talk! *wink* I used crumb cake for my card base, sponged chocolate chip around the edges, and crumb cake ink for my sponged ornament. I stamped my snowflake from SU Winter Post in Cherry cobbler, then sponged the edges of that panel with chocolate chip ink as well. I used my vintage wallpaper embossing folder for some texture, and distressed the edges. So What do ya think? Delicious! Thanks for taking a peek! All supplies Stampin' Up! Details below -

Stamps - Berry Christmas (sentiment) retired, Winter Post
Ink - Chocolate chip, Cherry cobbler, Crumb cake
Paper - Chocolate Chip, Cherry Cobbler, Crumb cake, Very Vanilla, Newsprint DSP, Early Espresso
Acess - Very vanilla satin ribbon, Big Shot, Vintage wallpaper Embossing folder, paper piercer, Scallop edge boarder punches, half pearl, sponge, dimensional dots, Chocolate chip ribbon, red hemp twine

Friday, November 19, 2010

a Ski Slope Free for all


Happy Friday!! I have the day to myself today. Well mostly anyway, I AM sitting here with the never ending laundry, but I think you get my point. I took time to play in today's Splitcoaststampers Friday free for all challenge. Our challenge was to make a thank you for those hostesses we will visiting during the holidays. I went ahead and made a gift bag for some lucky hostess that I will be seeing on a holiday visit. I have made this ensemble in the past, for various events like a bridal shower, and Mother's day, I just change up the DSP for the appropriate occasions. I started with a larger version of a box in a bag (tutorial in the resource section of Splitcoast). Then made some quick thank you cards, a little box to hold 3 tea bags, a nugget box, bookmark, and a beaded pen. Super cute right. It's a great little gift to have on hand for that extra special hostess in your life. Thanks for taking a peek. Directions for the bag are below -

You will need -
1 piece of card stock 8 1/2 x 7
2 pieces of card stock 1 1/2 x 10 1/2
2 pieces of coordinating DSP 6 x 10 1/2
Sticky Strip
Big shot
Top Note die
Coordinating ribbon, Buttons or Brads
scallop edge punch
Large Grommets

1. Start out by making your box, or base of your bag. Score the 8 1/2 x 7 piece at 1 1/2 inches on all sides. Cut up to your score line on each corner, then use sticky strip on the tabs to form your box, and keep it secure.
2. Take your 2 pieces of card stock 1 1/2 x 10 1/2 and punch your edges.
3. Cut out 2 Top Notes using your big shot, and score down the middle.
4. Now to assemble your bag. Take the (2) 6 x 10 1/2 pieces of DSP and apply sticky strip to 3 sides of one of the pieces, and just the bottom of the other. (make sure you apply your adhesive on the opposite side the paper that you want on the outside of your bag. ) Lay the DSP with the single strip of adhesive flat on your work surface, and remove the sticky strip backing.  Starting in the center, line up your box with the edge. Press firmly, and wrap the edges around the sides. Repeat with the remaining piece of DSP. Once your bag has sides, you just repeat these steps to adhere your decorative edge.
5. Take your 2 top note pieces and fold them in half. Adhere one side to the front of the bag. Using your cropadile place to large grommets on each side. Cut 2 pieces of 13 inch ribbon and thread through the grommets, and adhere the tab of ribbon to the inside of the bag. Fold down the other half of the top note die, and secure with more sticky strip.
6. Add your brads to the centers of the top note dies.
7. To close your bag, cut a piece of ribbon long enough to go under the brad in the back of the bag, across the top and under the brad or button in the front. Tie in a knot or bow.
8. Fill  bag, with your choice of gifts for your holiday hostesses. :)

Wednesday, November 17, 2010

Party Hearty


Hellooooooo! It seems I have been away for a few days again... Sorry about that! I hope you missed me as much as I missed you. Today I needed to sit down and make a birthday card for one of my Son's friends who is turning 11. I always get so stuck with this age group. I never want to offend and make the card to childish, and I don't want to make it too mature either. So I played along in the sketch challenge on splitcoast to give me a starting point. OK .. boy card, boy card.. boy card....I chose some boy colors, and went to work. I used some retired SU papers, again! I am really good for that right! I used bermuda bay, soft sky, Sweet pea DSP, and Good neighbor DSP. I used Party Hearty for my stamp set using the sentiment, and the party hats to create a little banner. Thanks for stopping by and taking a peek. All supplies Stampin' Up! Details below -

Stamps - Party Hearty
Paper - Bermuda Bay textured, Whisper white, Sweet pea DSP, Good Neighbor dsp, Soft sky, Taken with teal
Ink - versamark, early espresso
Accessories - scallop edge punch, mini library clip, linen thread, dimensional dots

Saturday, November 13, 2010

sketch (a)Peale

Hi all! I want to share a card with you that I have made for Jen del Muro's SFYTT this week. I have been trying to get down here to play all day, and  finally got the chance. I used some Cocoa Kisses DSP, and a favorite set of mine Berry Christmas. I know, I know these are both retired, but my motto is "use it if ya got it." The sentiment is from Occasional Quotes and  is a quote by Norman Vincent Peale. Hence the title of this post. I hope you like it. Thanks for stopping by today, details are below.

Stamps - Berry Christmas (retired), Winter post
Paper - Soft Suede, Whisper White, Cocoa Kisses DSP (retired)
Ink - soft suede, Real red
Access - red satin ribbon, playground button, white string, paper piercer, distressing tool, dimensional dots

Thursday, November 11, 2010

Many Tanks

Where did the week go? Time is really flying by this November...today I took time to play along in the ways to use it challenge on Splitcoast. Our challenge hostess asked us to create a card for Veterans Day, or Remembrance Day if you live in Canada. After reading the challenge details, I knew exactly what I was going to do. I pulled out all the various thank you sentiments that I have from my SU sets, and created some DP with them. I also used one of my ALL TIME favorite stamps, this little tank from the SU set Words by Wilson. (My affection runs deep for this stamp, considering my past occupation, and my screen name on Splitcoast.... tankgrl *wink*)  I hope you take time to remember those that are serving or have served their countries. Many Tanks too you!! Thanks for taking a peek, details below -

Stamps - Various Thank you stamps, Words by Wilson (retired), Extreme elements
paper - Old olive, Concord crush, poppy parade, whisper white
ink - old olive, black, river rock, marina mist
access - black marker, aqua painter, daffodil delight 1/8 ribbon, small star punch (retired), dimensional dots

Monday, November 8, 2010

Sparkly & Bright

Monday already? I fit in some time to play over the weekend, in between cleaning up the yard, and carting kids here and there. Glad I did too! I just received this set in a recent order, and have been wanting to get inky with it for days. I had originally saw this set as perfect for tags this holiday season, but I think I am going to use in workshops for cards too! For my first sample I used non traditional Christmas colors, Melon Mambo, and Marina Mist. I punched out various sized circles, then stamped them with the darling snowflake in the set. I then adhered them randomly onto the card front. I used wild wasabi, marina mist, and melon mambo to ink up my tree, stamped it twice, cut out one, and popped it up on top of the other for some dimension. I used one of the essential rhinestones for the star on my tree, stamped my sentiment in basic black, then finished it off with some Marina Mist ribbon.  Super FUN!

My second sample using this set I used the stocking, and some accessories from the loads of love set. I used Sahara Sand for my card base. I stamped the stockings in a row using versamark, then stamped one in Old Olive. I stamped the snowflake in versamark on top of the Old Olive stocking, then cut it out and added some Crystal effects and some Dazzling Diamond glitter to the "bells" for some detail. I stamped my packages from Loads of love on a scrap and colored them with a blender pen, and markers. I cut out the packages and attached them to the stocking with a glue dot. I popped the finished stocking up over one of the other stockings, Sponged the edges of my card with Crumb cake, then stamped my sentiment to complete the card. I hope you had time to play over the weekend, and thanks for stopping by and taking a peek. Details below -


Mambo Bright card -
Stamps - Sparkly & Bright
Paper - Melon Mambo, Whisper White
Ink - Melon Mambo, Wild wasabi, early espresso. Marina Mist, black
Access - Circle punches, essential rhinestones, Marina mist 1/8 ribbon, dimensional dots

Sahara Stocking card -
Stamps - Sparkly & Bright, Loads of Love Accessories, teeny tiny wishes
Paper - Sahara sand
ink - versamark, crumb cake, old olive, real red, garden green
Access - open scallop punch, Crystal effects, blender pen, Dazzling diamonds glitter, dimensional dots, sponge

Friday, November 5, 2010

Simple snowflake

Happy Friday... I have two cards to share with you today, both are of the K.I.S.S./CAS variety. The first one I just love. I used my SU snowflake punch, and very simple details. I layered my very vanilla punched panel on top of a cherry cobbler panel, so it would show through. I took my perforating tool, and gently ran it over my early esspresso pad to ink it up, than added the dotted lines to make the snow flake look like an ornament, than finished it off by adding a vanilla button, laced with some early espresso 1/8 ribbon. I stamped my sentiment using Sincere Salutations, a set that I always over look. Super quick, and cute to boot!

This next one I found while checking out a good friends blog! (Thanks Penny!) I used the same LO, just changed up the stamps. I actually created Dashers background, by stamping my "C" block directly into my Baja Breeze stamp pad. I then stamped Dasher on top of that image. I outlined the edge of the  stamped block with two way glue and Dazzling diamonds. Another super quick, and cute one! Don't ya just love them! Thanks for stopping by, and taking a peek! :) Details below -

Snowflake card -
Stamps - Scincere Salutations
Paper - Early Espresso, Very vanilla, Cherry Cobbler
Ink - Early Espresso
Access - snow flake punch, perforating tool, 1/8 early espresso ribbon, vanilla button, glue dot

Dasher card -
Stamps - Scincere Salutations, C block, Dasher
Paper - Crumb cake, whisper white, cherry cobbler
Ink - baja breeze, early espresso
Access - spiral punch, twoway glue, Dazzling diamonds, dimensional dots, 1/8 eraly espresso ribbon

Wednesday, November 3, 2010

clearly a sketch

Hi all.. Please forgive me for my short absence. Lots happening here including my entire household having Strep throat. Lets just say it was a REAL interesting couple of days around here. We are all on the mend, and I have felt a little deprived of my stamps, so I got to sneak downstairs today for a little while. I played along in the sketch challenge on Splitcoast. This one really had me thinking, I was almost afraid I lost my mojo. I looked around at the scraps I had on my desk, and went to work. I had a scrap of clear acetate on my desk, and dry embossed it with my new Northern Flurry embossing folder by SU. I had never tried this before, so today was the day. I am still using up my SU holiday dsp scraps from years past, but I am sure that you can replace with ones that are in the current catalog. I am glad I got to sneak away for a little while today, I hope you get a chance to do the same. Thanks for stopping by and taking a peek. All supplies Stampin' Up! Details below-
Stamps - Many Merry Messages
Paper - ski slope DSP (retired) Pawsitively prints DSP (retired) old olive, whisper white, baja breeze
ink - real red
access - big shot, Northern flurry embossing folder, perfect polka dot embossing folder, snowflake sizzlit, playground button, silver cord, window sheet, paper piercer, dimensional dots

Play Day Brewing

Hey Everyone! I have a card to share today! I Know!... I am in as much disbelief as you! We are steadily approaching the Holiday season.. ...